Thanks Will01,
To be honest the exhaust was built by someone GC recommended, hence why the quality of work is so good. As you can imagine I'm very pleased with the work and it isn't too noisy but sounds great when I'm driving hard.
If you search on YouTube 'Fiat 124 spider 7500 rpm' you'll see a cheesy clip of me doing some test runs...
1977 124 Spider CS1 - Lincolnshire UK
-
PumaPhil
- Posts: 71
- Joined: April 22nd, 2013, 5:18 pm
- Location: Lincolnshire, UK
- Contact:
Re: 1977 124 Spider CS1 - Lincolnshire UK
GC-05
'If you think experts are expensive, you should try amateurs!'
A redline run my GC's engine: https://www.youtube.com/watch?v=80nEhsJbH2w
'If you think experts are expensive, you should try amateurs!'
A redline run my GC's engine: https://www.youtube.com/watch?v=80nEhsJbH2w
-
miro-1980
- Posts: 687
- Joined: December 3rd, 2007, 3:40 pm
- Location: Warsaw suburb , Poland
- Contact:
Re: 1977 124 Spider CS1 - Lincolnshire UK
I fully concur !
Looks perfect and the workmanship looks superb.
As regards the length of primaries, I claim ignorance.
I know however that theories on lengths of primaries (and secondaries for a 4-2-1) evolved. I have a pretty standard 4-1 and must say was advised by GC against putting 4-2-1 given what the car is used for.
As it became painfully obvious several times during development of my 131 project if you modify one element you must modify several others and when you do that you gain something but always lose something.
There is always some gain ad some loss. ( As they say nothing is free ...)
I will following with great interest how you finally deal with the temp issue. It really took me several years to get it right, but finally I have resolved it to my full satisfaction .
Miro
www.Fiat-abarth-rally.com
GC_93
GC_93
-
Guy Croft
- Site Admin
- Posts: 5039
- Joined: June 18th, 2006, 9:31 am
- Location: Bedford, UK
- Contact:
Re: 1977 124 Spider CS1 - Lincolnshire UK
No Miro,
I just advised you to use the same configuration as it was dynoed with - a 27" 4-1
Altering an exhaust manifold that works well can be a flying leap into the unknown!
G
I just advised you to use the same configuration as it was dynoed with - a 27" 4-1
Altering an exhaust manifold that works well can be a flying leap into the unknown!
G
Guy Croft, owner
-
beardybloke
- Posts: 17
- Joined: October 19th, 2014, 12:17 pm
- Location: Bristol , England
- Contact:
Re: 1977 124 Spider CS1 - Lincolnshire UK
Hi Phil , just wondered if you had some advice . I have started to fit the Weber Plenum kit and although it says it takes a 70mm duct it does not seem to fit as well as yours . What did you use as a hose joiner to the plenum , weber say they do not do one so just wondered what you used , thank you Andy.
GC_100
-
PumaPhil
- Posts: 71
- Joined: April 22nd, 2013, 5:18 pm
- Location: Lincolnshire, UK
- Contact:
Re: 1977 124 Spider CS1 - Lincolnshire UK
Hello Andy, did you speak to Webcon? As I'm pretty sure they supplied the hose. I just have a small seed of doubt wondering if the rubber hose came with the K&N Apollo filter, but I'm pretty sure the rubber hose did come from Webcon.
thank you, Phil
thank you, Phil
GC-05
'If you think experts are expensive, you should try amateurs!'
A redline run my GC's engine: https://www.youtube.com/watch?v=80nEhsJbH2w
'If you think experts are expensive, you should try amateurs!'
A redline run my GC's engine: https://www.youtube.com/watch?v=80nEhsJbH2w
-
beardybloke
- Posts: 17
- Joined: October 19th, 2014, 12:17 pm
- Location: Bristol , England
- Contact:
Re: 1977 124 Spider CS1 - Lincolnshire UK
Hi Phil , I did ask webcon originally as it looking like a purpose designed fitting but they told me they did not supply these ?. Just checked on webcon website and you are correct they do supply them specifically for the plenum ! , guess it serve`s me right for asking them and not checking myself , thanks for the advice Andy.
GC_100
-
PumaPhil
- Posts: 71
- Joined: April 22nd, 2013, 5:18 pm
- Location: Lincolnshire, UK
- Contact:
Re: 1977 124 Spider CS1 - Lincolnshire UK
Hi Andy, I'm pretty sure the hose came from Webcon because the K&N one is a flexible aluminium tube which I did not use. I would agree with you in contacting Webcon again! I got the Apollo filter from an internet auction site from a guy who bought some as a job lot and was getting rid of them. Sorry if that's not much help for you. But at least you know the Apollo filter works a treat, it's just a matter of finding one at a reasonable price.
thank you, Phil
thank you, Phil
GC-05
'If you think experts are expensive, you should try amateurs!'
A redline run my GC's engine: https://www.youtube.com/watch?v=80nEhsJbH2w
'If you think experts are expensive, you should try amateurs!'
A redline run my GC's engine: https://www.youtube.com/watch?v=80nEhsJbH2w
-
PumaPhil
- Posts: 71
- Joined: April 22nd, 2013, 5:18 pm
- Location: Lincolnshire, UK
- Contact:
Re: 1977 124 Spider CS1 - Lincolnshire UK
Andy, I've done some digging and I'm wondering if you were looking at the wrong Weber outlet?
Anyway, the part you need is listed here http://m.webcon.co.uk/productdetail.mobile?id=9229 and the part number is 9990119700. I hope that helps.
Regards, Phil
Anyway, the part you need is listed here http://m.webcon.co.uk/productdetail.mobile?id=9229 and the part number is 9990119700. I hope that helps.
Regards, Phil
GC-05
'If you think experts are expensive, you should try amateurs!'
A redline run my GC's engine: https://www.youtube.com/watch?v=80nEhsJbH2w
'If you think experts are expensive, you should try amateurs!'
A redline run my GC's engine: https://www.youtube.com/watch?v=80nEhsJbH2w
-
beardybloke
- Posts: 17
- Joined: October 19th, 2014, 12:17 pm
- Location: Bristol , England
- Contact:
Re: 1977 124 Spider CS1 - Lincolnshire UK
thank you Phil , spoke to webcon that is the correct part number for the intake hose . Unfortunately I have ordered my filter from K+N so bit expense but should be worth it .I am going to get it all fitted and then get a webcon hose if I can not get it sealed up properly . The problem I have at present is to find a space to get it to fit I have to run the intake hose quite a distance so can`t use a short hose as you have done , so for now it will be make it fit , have to redesign engine bay later!.
Thanks for the help and advice , once again , Andy.
Thanks for the help and advice , once again , Andy.
GC_100
-
PumaPhil
- Posts: 71
- Joined: April 22nd, 2013, 5:18 pm
- Location: Lincolnshire, UK
- Contact:
Re: 1977 124 Spider CS1 - Lincolnshire UK
It's been a while since I've posted an update but my Spider was away for a while in the Spring having a 131 'box fitted and the front suspension upgraded. See the next post for the suspension details.
The 131 'box being rebuilt after being refurbished.
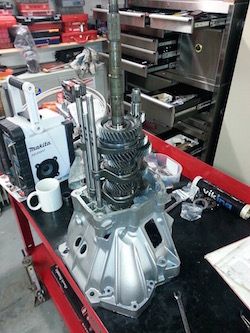
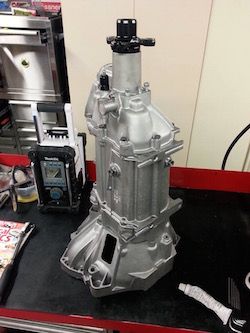
Note no doughnut.
To make it fit the gearbox cross-member was re-fabricated to lower the tail end of the gearbox, this was to get the clearance required between the top of the gearbox and the tunnel. The rubber mount is from a 131 Mirafiori Sport, it fits the aperture in the 124 cross member.
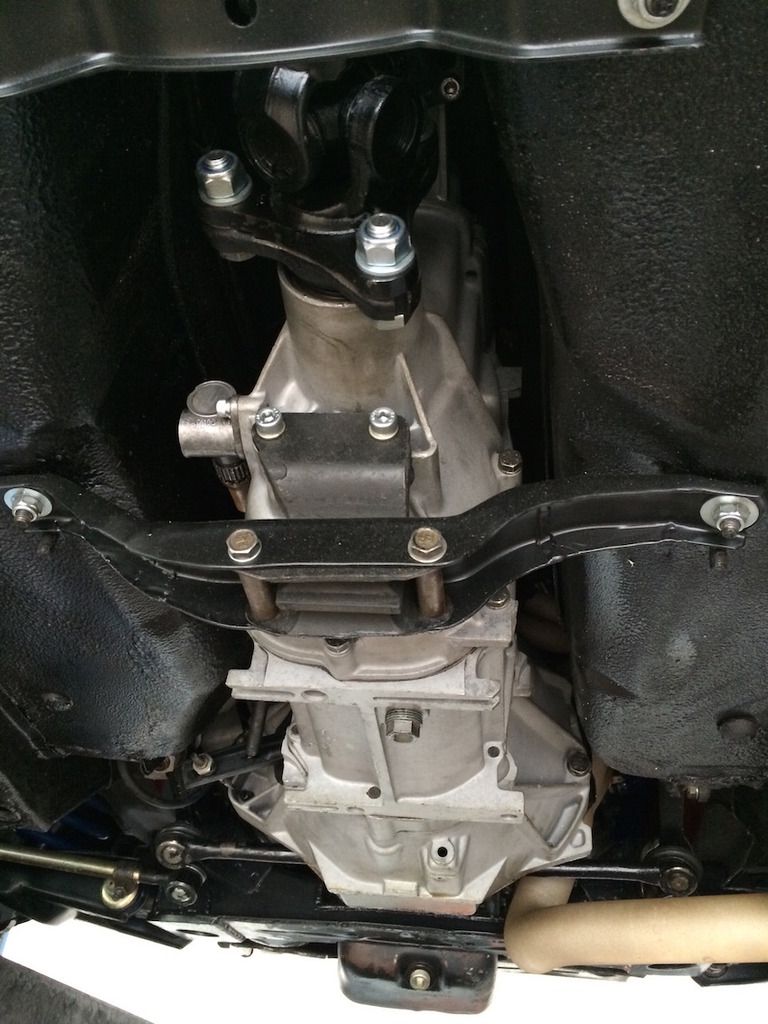
The engine was lowered by using race spec' engine mounts. This lowered the engine by around one inch. Consequently, there was no need to modify the transmission tunnel to make the 131 'box fit!
The cross-member was modified to cope with the lowered engine - the sump has since been repainted!
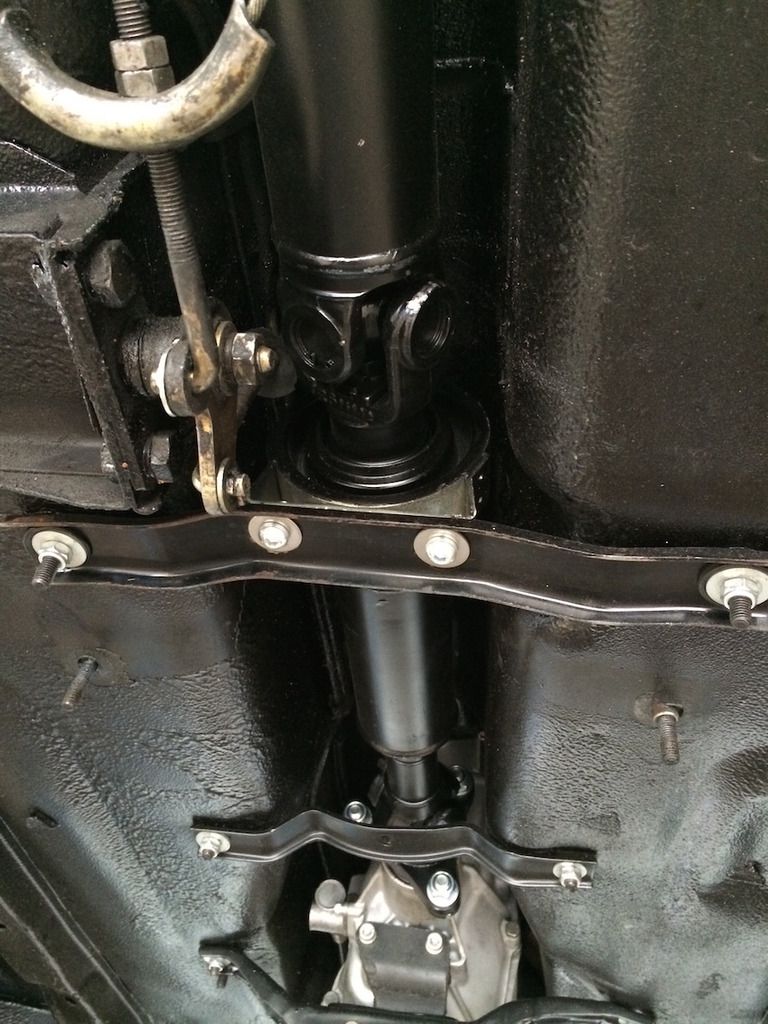
A view of the central bearing.
A new propshaft was made because after being examined for modification mine was deemed to be 'junk'!
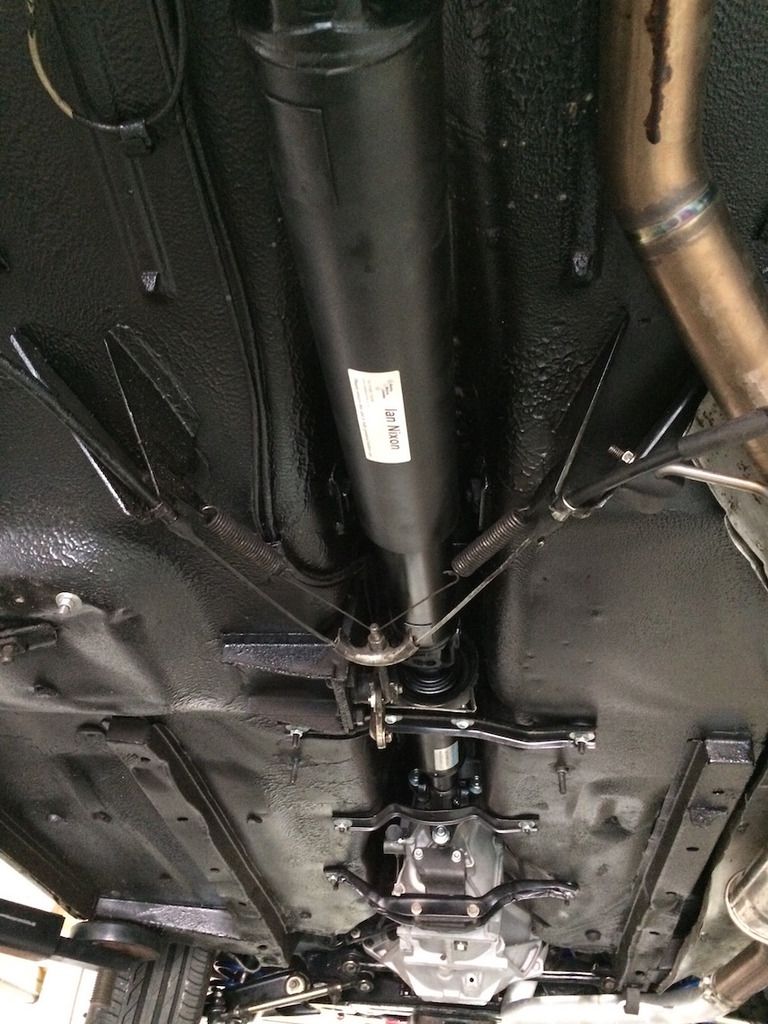
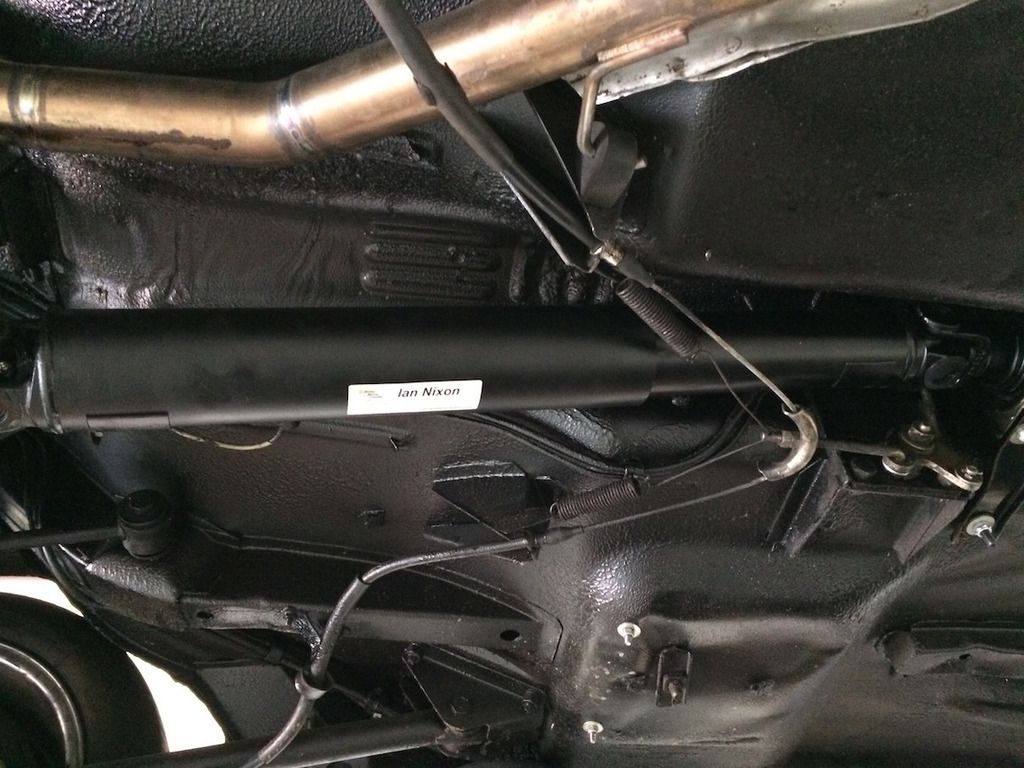
The rear section contains a tube within a tube sandwiched with rubber. This does the job of the rubber doughnut. Consequently, this can not fail like a doughnut can and it can take a lot of power.
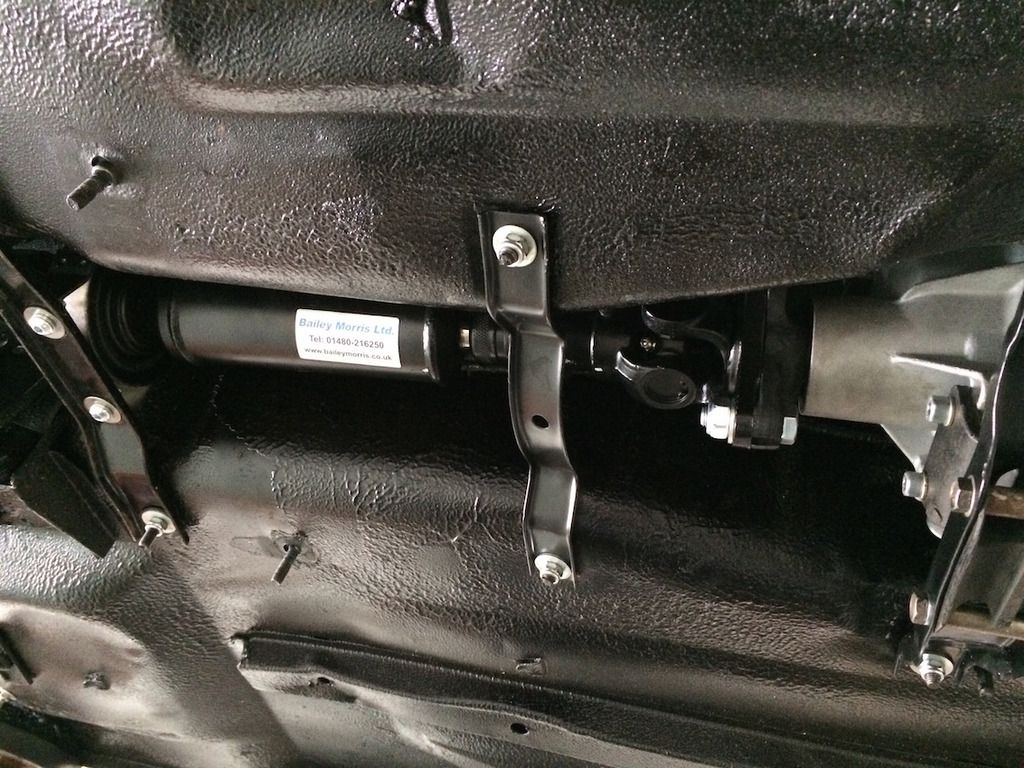
The propshaft was made by Bailey Morris Ltd to a design by Ian Nixon who did the conversion for me.
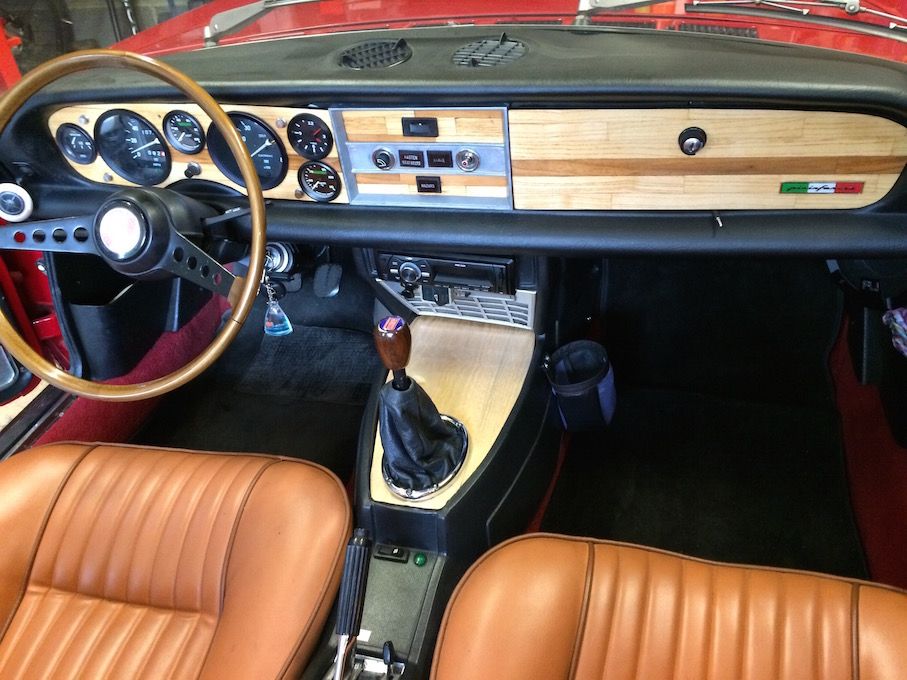
The view inside with a 131 'box. The ashtray has had to go due to the position of the gearstick, the remote gearchange is essential otherwise the gearstick would be hard up against the radio console.
A new wooden cover was made and I found a closely matching veneer. Veneering is another skill I have gained during this project!
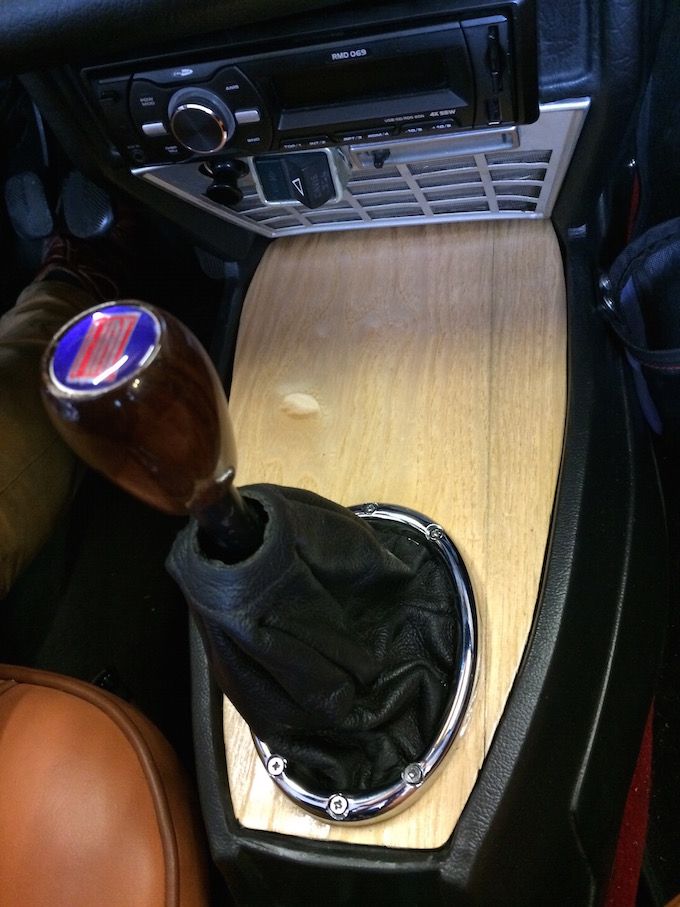
I managed to find a nice chrome ring to finish off the work.
When embarking on this project I was told, and found it repeated on many blog threads, that to give reliability and cope with additional power, a 131 'box is required. I can now say that it is a huge improvement as I can change gear quickly and there is no 'graunching' as the synchros try to cope. Also, the 5th gear is slightly taller which is welcome at motorway speeds (0.881:1 v 0.834:1, or at 70 mph = 3750 rpm v 3500 rpm)
The 131 'box being rebuilt after being refurbished.
Note no doughnut.
To make it fit the gearbox cross-member was re-fabricated to lower the tail end of the gearbox, this was to get the clearance required between the top of the gearbox and the tunnel. The rubber mount is from a 131 Mirafiori Sport, it fits the aperture in the 124 cross member.
The engine was lowered by using race spec' engine mounts. This lowered the engine by around one inch. Consequently, there was no need to modify the transmission tunnel to make the 131 'box fit!
The cross-member was modified to cope with the lowered engine - the sump has since been repainted!
A view of the central bearing.
A new propshaft was made because after being examined for modification mine was deemed to be 'junk'!
The rear section contains a tube within a tube sandwiched with rubber. This does the job of the rubber doughnut. Consequently, this can not fail like a doughnut can and it can take a lot of power.
The propshaft was made by Bailey Morris Ltd to a design by Ian Nixon who did the conversion for me.
The view inside with a 131 'box. The ashtray has had to go due to the position of the gearstick, the remote gearchange is essential otherwise the gearstick would be hard up against the radio console.
A new wooden cover was made and I found a closely matching veneer. Veneering is another skill I have gained during this project!
I managed to find a nice chrome ring to finish off the work.
When embarking on this project I was told, and found it repeated on many blog threads, that to give reliability and cope with additional power, a 131 'box is required. I can now say that it is a huge improvement as I can change gear quickly and there is no 'graunching' as the synchros try to cope. Also, the 5th gear is slightly taller which is welcome at motorway speeds (0.881:1 v 0.834:1, or at 70 mph = 3750 rpm v 3500 rpm)
Last edited by PumaPhil on August 18th, 2015, 10:00 pm, edited 2 times in total.
GC-05
'If you think experts are expensive, you should try amateurs!'
A redline run my GC's engine: https://www.youtube.com/watch?v=80nEhsJbH2w
'If you think experts are expensive, you should try amateurs!'
A redline run my GC's engine: https://www.youtube.com/watch?v=80nEhsJbH2w
-
PumaPhil
- Posts: 71
- Joined: April 22nd, 2013, 5:18 pm
- Location: Lincolnshire, UK
- Contact:
Re: 1977 124 Spider CS1 - Lincolnshire UK
After discussing the gearbox installation with Ian Nixon, he mentioned that he modifies the front suspension to improve turn-in and self-centering. I'd always felt that the steering was heavy and vague, so whilst having the 131 'box installed I had the suspension modified too, especially as this provided some savings than doing these jobs separately!
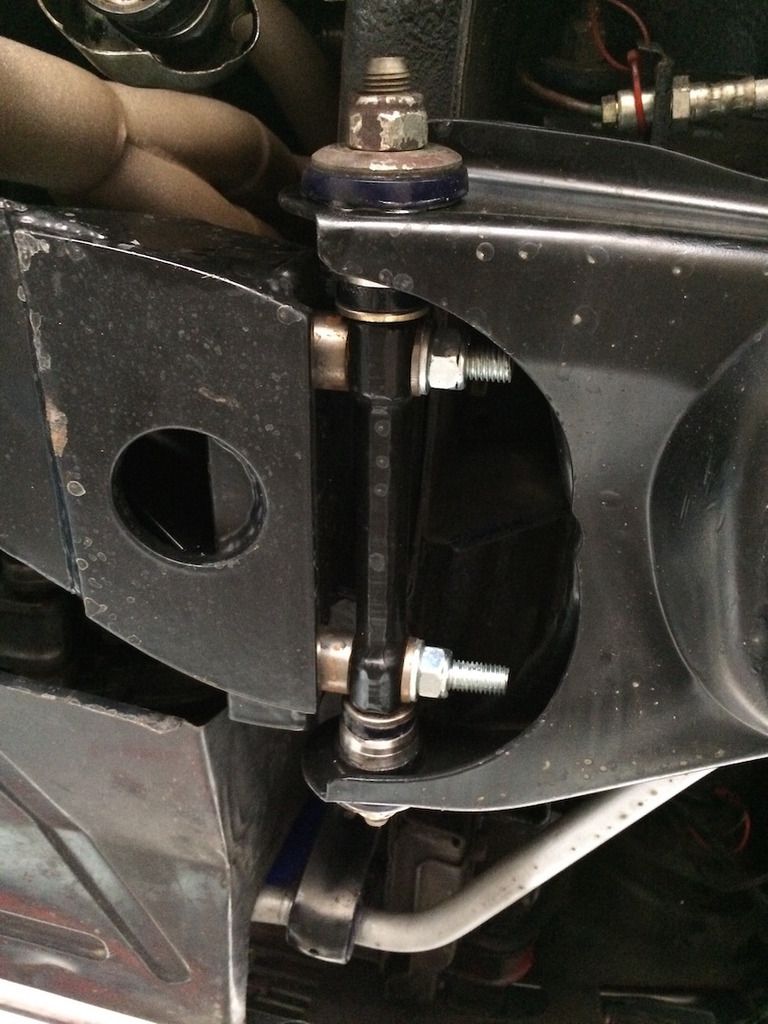
The wishbones were strengthened and moved forward 10 mm to improve turn-in.

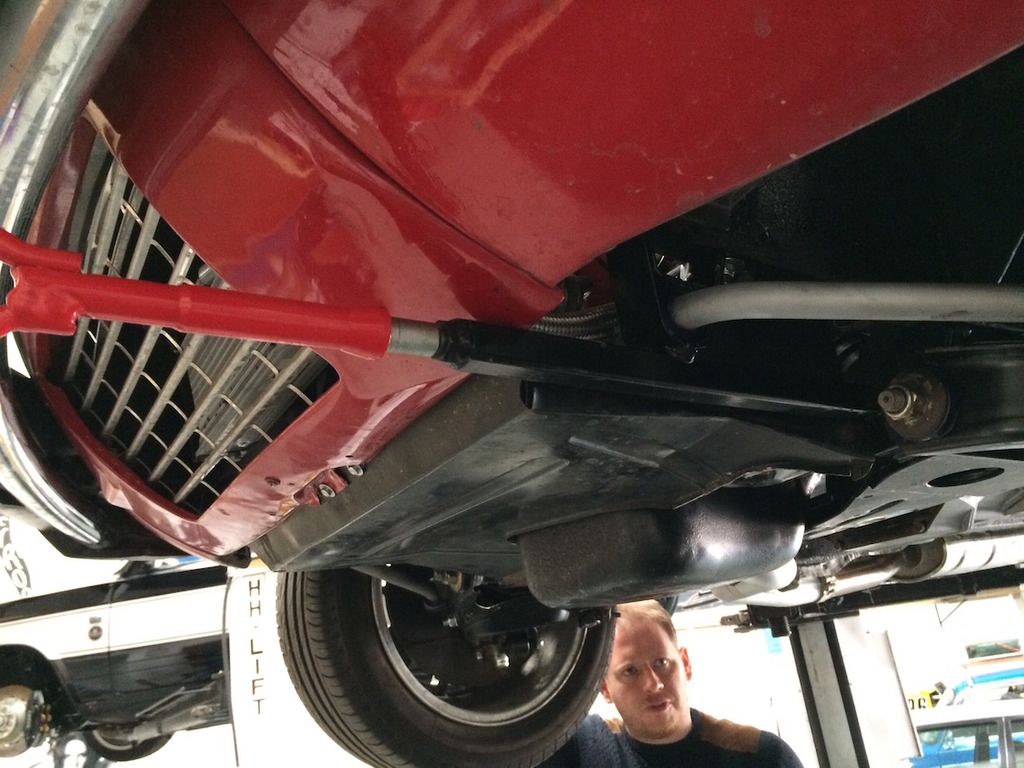
Ian was, at my request, also able to make a sturdy towing point. I can screw in the red towing eye as shown and use a solid tow bar if required.
Ian also modified the anti-rollbar brackets to cope with the changed geometry. He was keen to fit double roll-bars as per his racing Lada but due to funding limitations, and because my 124 is for road use only, I thought it unnecessary. Although Ito be fair to Ian, he believes it would offer a further improvement.
The very stiff steering was due to the steering idler being virtually seized, but a refurbished idler coupled with Ian's work has made the 124 a delight on the roads. It is far more 'alert' and responsive plus much lighter to steer. Overall, an excellent modification that I would recommend highly.
The wishbones were strengthened and moved forward 10 mm to improve turn-in.
Ian was, at my request, also able to make a sturdy towing point. I can screw in the red towing eye as shown and use a solid tow bar if required.
Ian also modified the anti-rollbar brackets to cope with the changed geometry. He was keen to fit double roll-bars as per his racing Lada but due to funding limitations, and because my 124 is for road use only, I thought it unnecessary. Although Ito be fair to Ian, he believes it would offer a further improvement.
The very stiff steering was due to the steering idler being virtually seized, but a refurbished idler coupled with Ian's work has made the 124 a delight on the roads. It is far more 'alert' and responsive plus much lighter to steer. Overall, an excellent modification that I would recommend highly.
GC-05
'If you think experts are expensive, you should try amateurs!'
A redline run my GC's engine: https://www.youtube.com/watch?v=80nEhsJbH2w
'If you think experts are expensive, you should try amateurs!'
A redline run my GC's engine: https://www.youtube.com/watch?v=80nEhsJbH2w
-
PumaPhil
- Posts: 71
- Joined: April 22nd, 2013, 5:18 pm
- Location: Lincolnshire, UK
- Contact:
Re: 1977 124 Spider CS1 - Lincolnshire UK
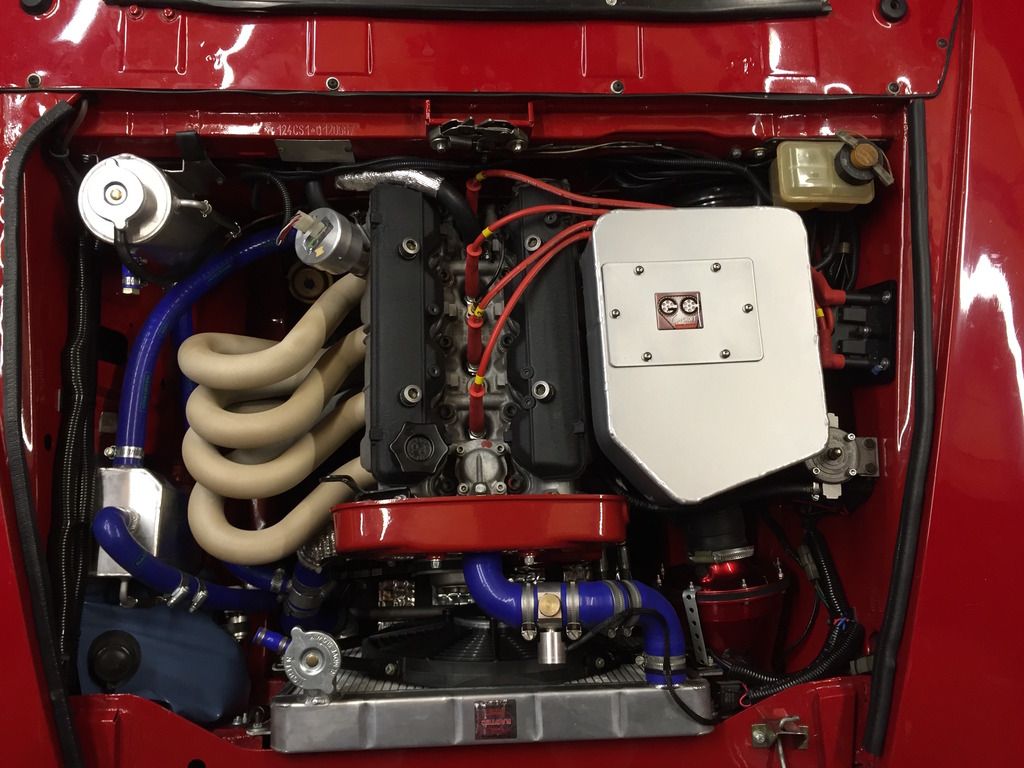
I have been plagued by overheating issues, especially in traffic. I suspected it was partly due to the bespoke exhaust manifold creating lots of heat in the engine bay, so I had it coated by Zircotec in a shade of 'Antique Silver' with its performance coating. There is definitely less heat under the bonnet, which is obviously a good thing and meant that I could ditch those unsightly heat shields.
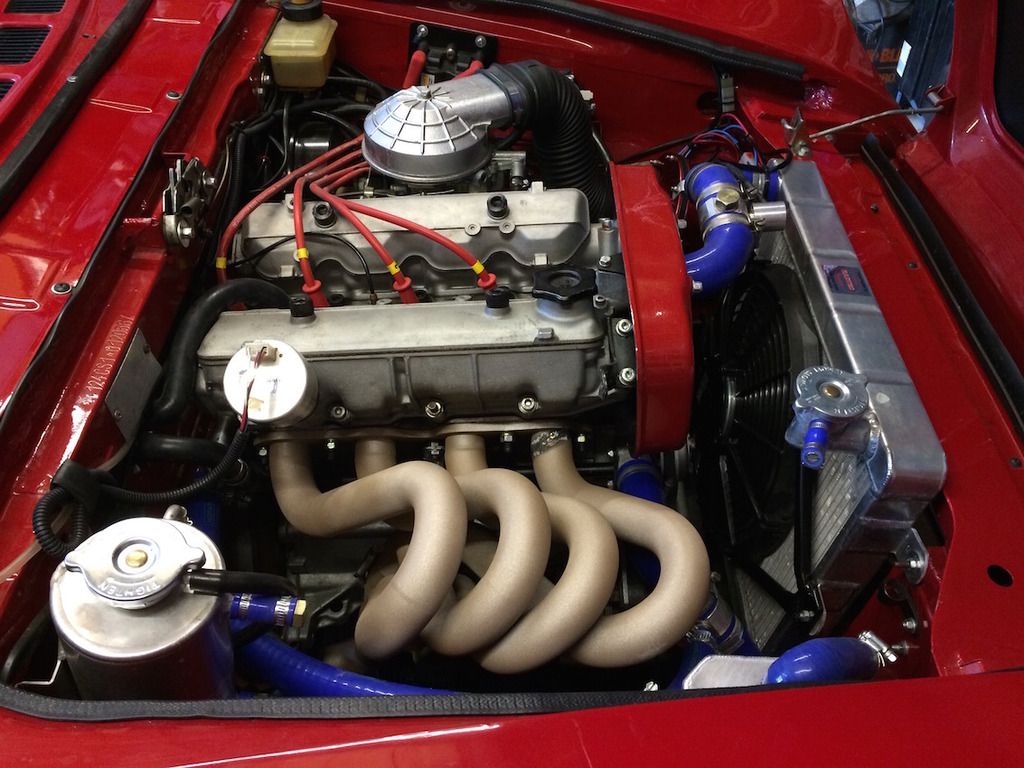
Shame about the welding scar to repair a crack. I will touch that up with VHT paint soon.
However, I was still getting overheating issues when I slowed down so I spoke to Classic Radiators as I bought my aluminium radiator from them and they originally stated that their radiator would provide around 30% more cooling capacity. The guys at Classic Radiators were very helpful and asked if there was a problem above around 30 mph, which it was not. They then asked what fan was fitted. I didn't know but it was the one that came wit the car and I thought it looked up to the job. I sent them a photo of the fan and they confirmed that it was a cheap Chinese knock-off and would not provide the '30 mph of cooling' that was required! So I ordered an uprated 12" SPAL fan. The results were obvious, despite being quieter I could feel a much stronger blast of air coming from the engine bay when I lifted the bonnet.
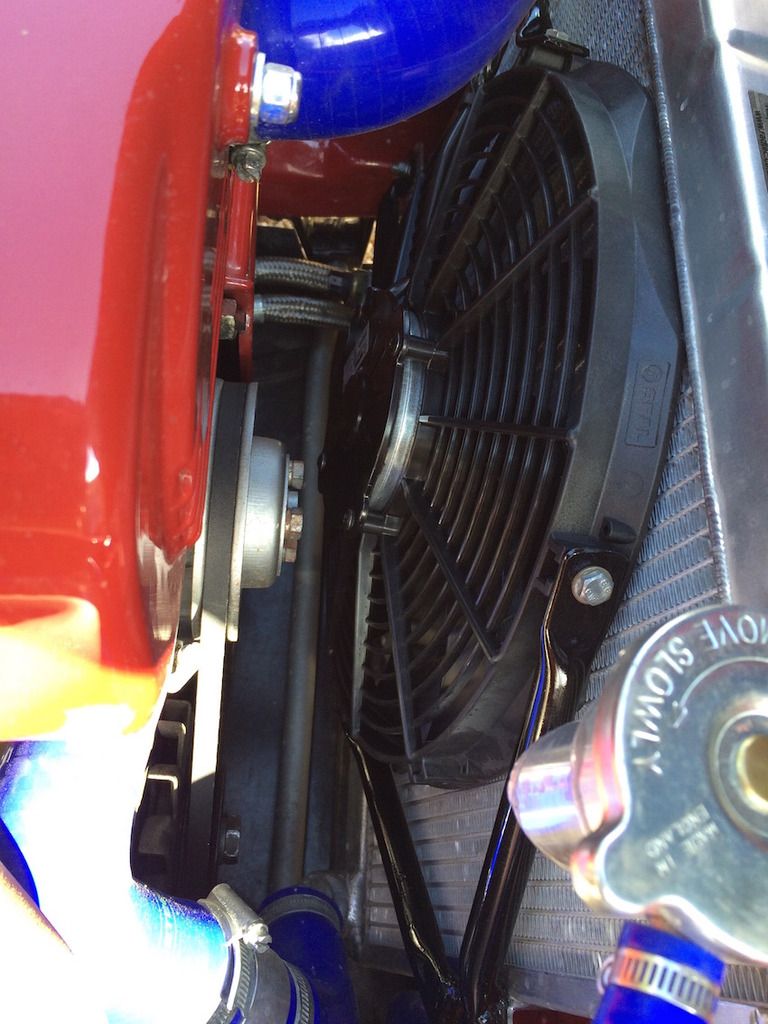
The new uprated SPAL fan.
The new fan has made a real difference, the engine stays around 80- 85C in traffic and the highest I've seen is it briefly go towards 90C. GC designed the engine to run around 75-80C so I am far happier with the result and my eyes are no longer nervously glancing at the temperature gauge every few seconds!
Shame about the welding scar to repair a crack. I will touch that up with VHT paint soon.
However, I was still getting overheating issues when I slowed down so I spoke to Classic Radiators as I bought my aluminium radiator from them and they originally stated that their radiator would provide around 30% more cooling capacity. The guys at Classic Radiators were very helpful and asked if there was a problem above around 30 mph, which it was not. They then asked what fan was fitted. I didn't know but it was the one that came wit the car and I thought it looked up to the job. I sent them a photo of the fan and they confirmed that it was a cheap Chinese knock-off and would not provide the '30 mph of cooling' that was required! So I ordered an uprated 12" SPAL fan. The results were obvious, despite being quieter I could feel a much stronger blast of air coming from the engine bay when I lifted the bonnet.
The new uprated SPAL fan.
The new fan has made a real difference, the engine stays around 80- 85C in traffic and the highest I've seen is it briefly go towards 90C. GC designed the engine to run around 75-80C so I am far happier with the result and my eyes are no longer nervously glancing at the temperature gauge every few seconds!
GC-05
'If you think experts are expensive, you should try amateurs!'
A redline run my GC's engine: https://www.youtube.com/watch?v=80nEhsJbH2w
'If you think experts are expensive, you should try amateurs!'
A redline run my GC's engine: https://www.youtube.com/watch?v=80nEhsJbH2w
-
PumaPhil
- Posts: 71
- Joined: April 22nd, 2013, 5:18 pm
- Location: Lincolnshire, UK
- Contact:
Re: 1977 124 Spider CS1 - Lincolnshire UK
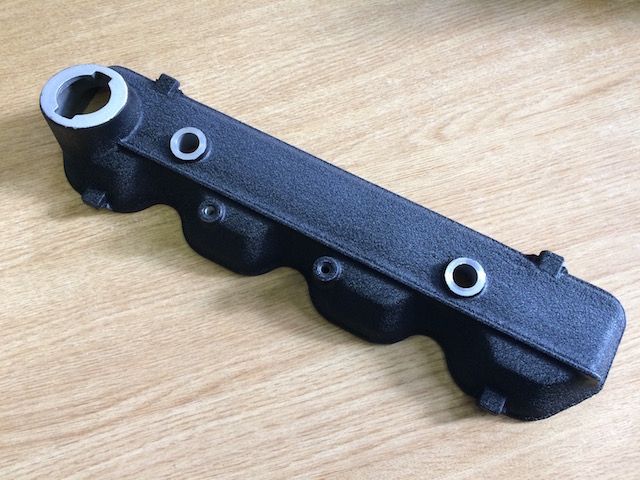
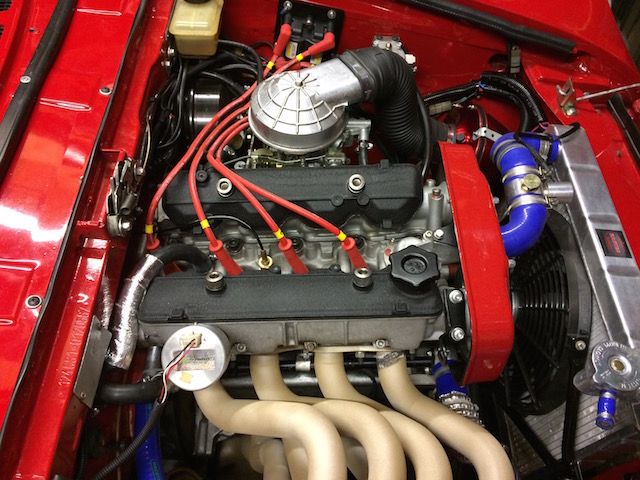
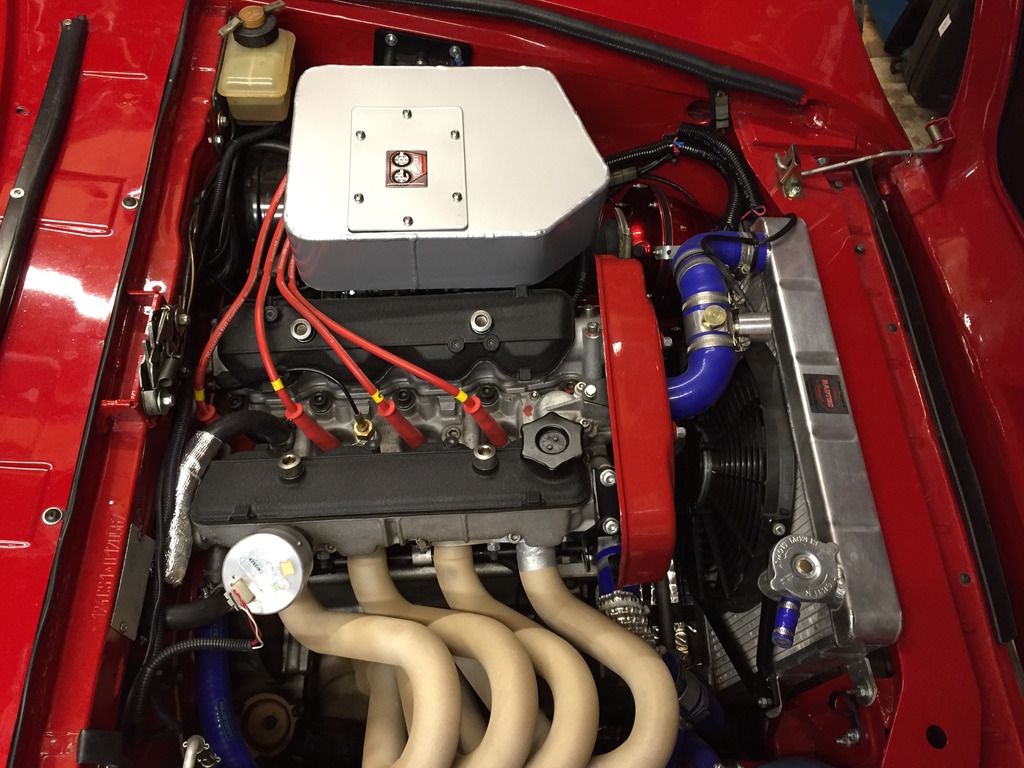
Now most of the car is finished I've turned my attention to doing some small cosmetic jobs. The cam covers always had a few small blemishes that I could not get rid of.
The marks are not too apparent in this picture but they are certainly there:
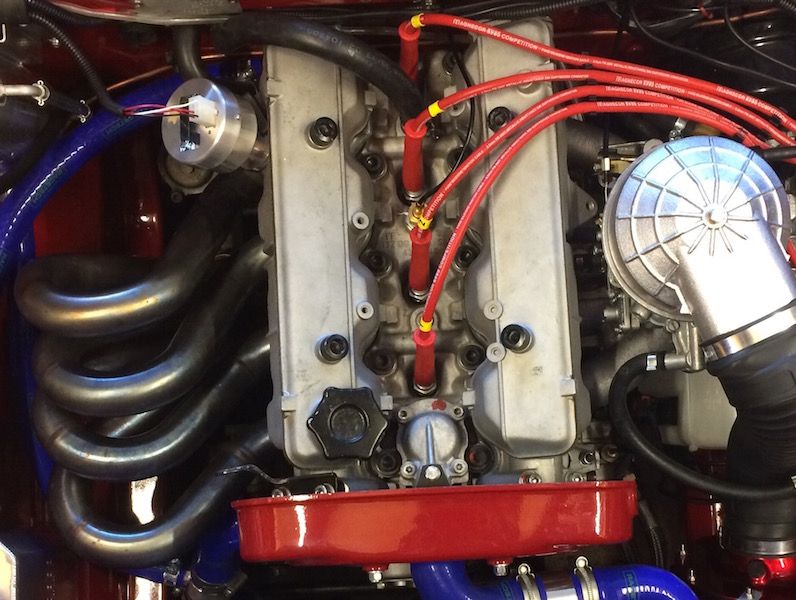
So I decided to paint the cam covers with VHT paint to get the crinkle effect. I was very please with the result.
And this is how they look on the engine. Personally, I'm really pleased with the result and how easy it is to get a professional looking finish.
The marks are not too apparent in this picture but they are certainly there:
So I decided to paint the cam covers with VHT paint to get the crinkle effect. I was very please with the result.
And this is how they look on the engine. Personally, I'm really pleased with the result and how easy it is to get a professional looking finish.
Last edited by PumaPhil on April 1st, 2016, 9:49 pm, edited 1 time in total.
GC-05
'If you think experts are expensive, you should try amateurs!'
A redline run my GC's engine: https://www.youtube.com/watch?v=80nEhsJbH2w
'If you think experts are expensive, you should try amateurs!'
A redline run my GC's engine: https://www.youtube.com/watch?v=80nEhsJbH2w
-
Guy Croft
- Site Admin
- Posts: 5039
- Joined: June 18th, 2006, 9:31 am
- Location: Bedford, UK
- Contact:
-
PumaPhil
- Posts: 71
- Joined: April 22nd, 2013, 5:18 pm
- Location: Lincolnshire, UK
- Contact:
Re: 1977 124 Spider CS1 - Lincolnshire UK
Plenum and distributor Problems!
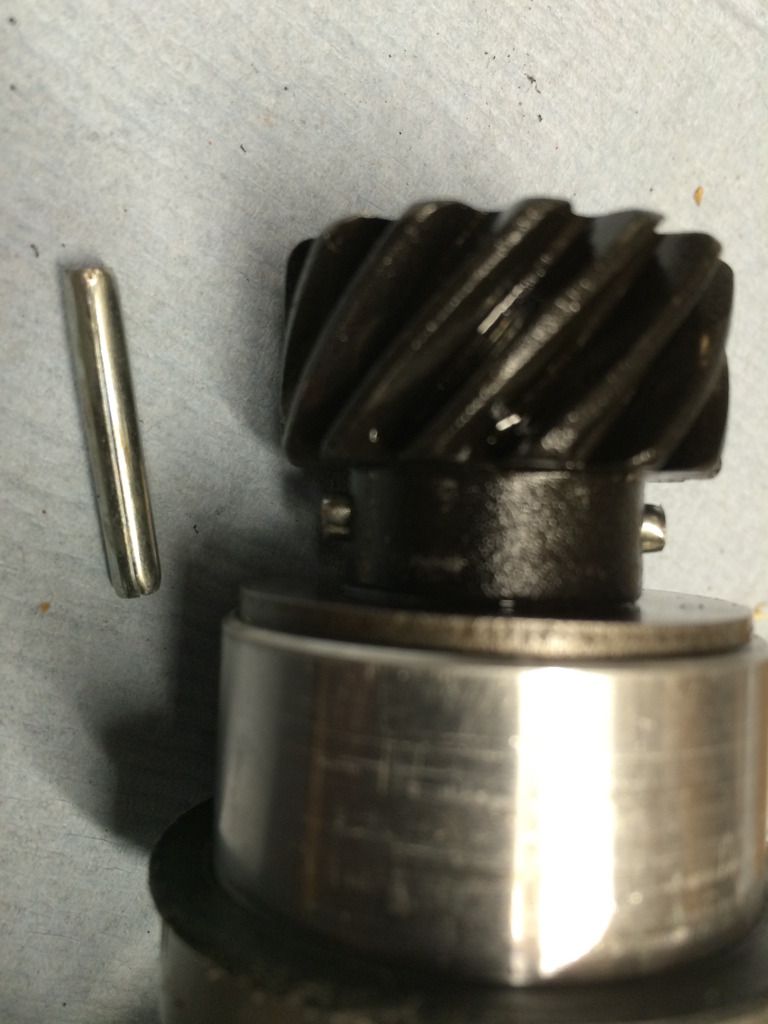
Last October I took my Spider to the renowned tuning experts at Northampton Motorsports to do a rolling road test. This was to iron out a small flat-spot which I thought could be resolved by re-jetting the carb plus I wanted to do a power run. However, they discovered that not only was the timing on the distributor jumping erratically, but that the small plenum over the carb was sapping 10 bhp!
The problem with the distributor was due to the pin holding the drive gear having slipped out and was hitting the cam casing. This must have been cause of the erratic timing as the tapping would cause the bob-weights to jump.
The bent pin having drifted out.
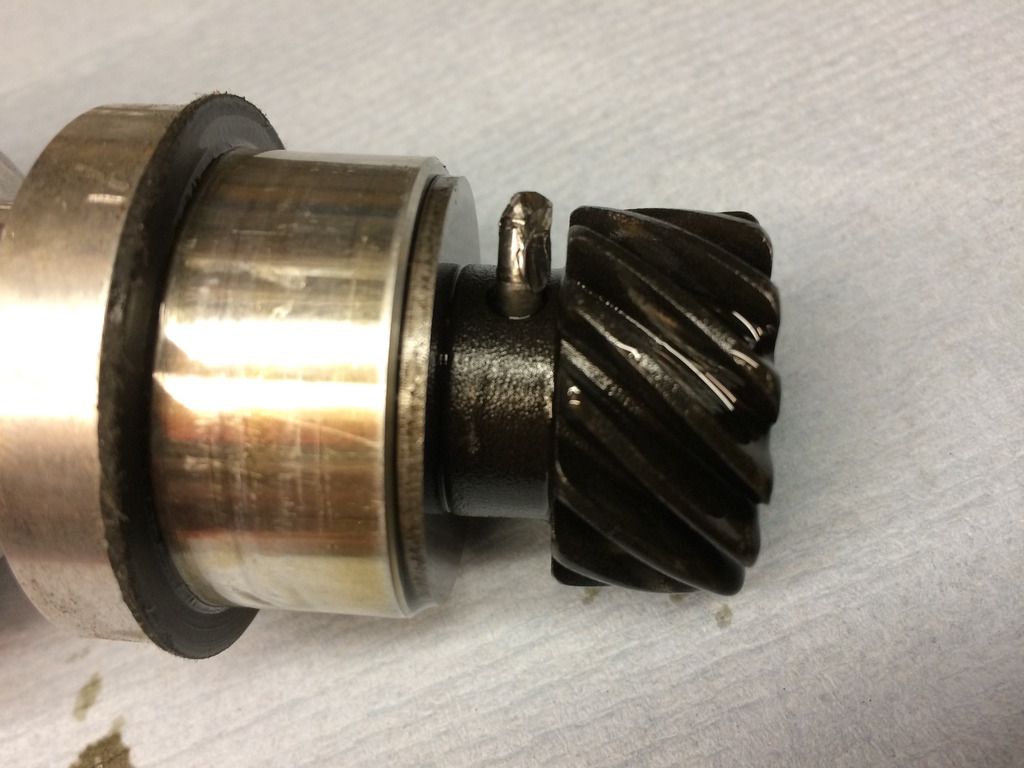
A witness mark on the casing is visible.

Finally fixed with a roll-pin.
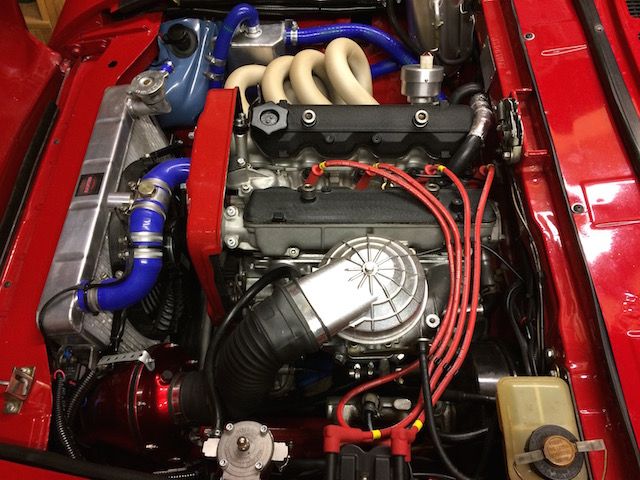
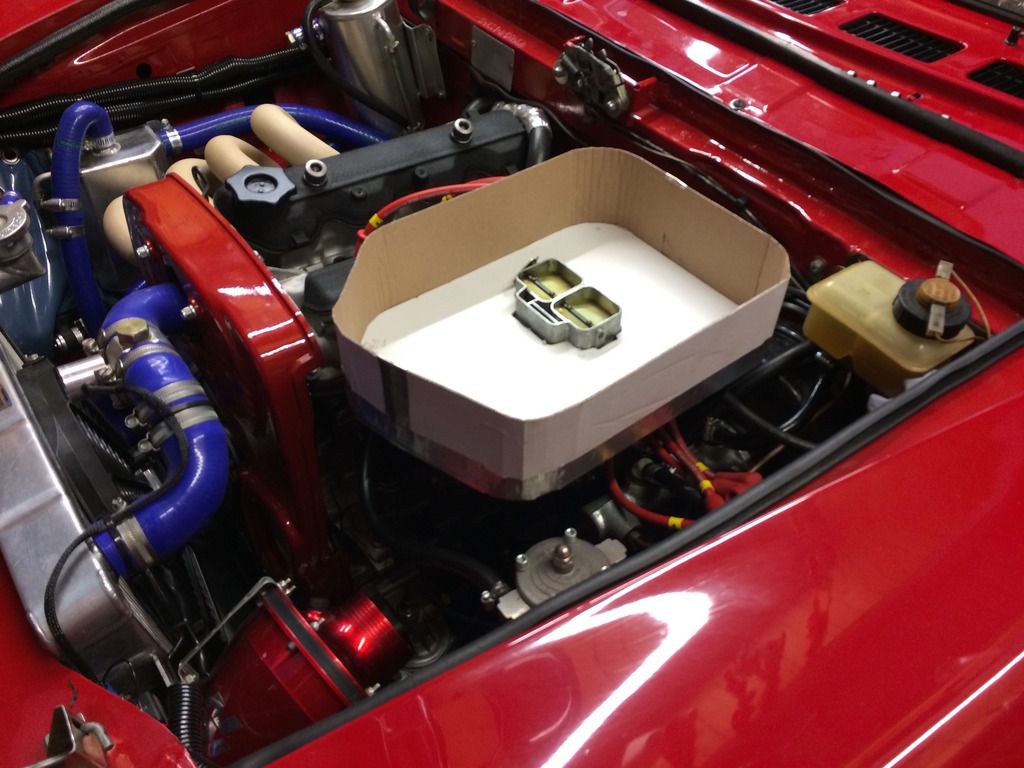
Ditching the plenum chamber
The other problem was the small plenum chamber, although neat and well made, it was sapping 10 bhp!
So I went to see the engineers at my work and I fabricated a cardboard dummy airbox to help them make one from aluminum. I made a pillar of Plasticine and placed it on the top of the cardboard lid (not shown) to check that it cleared to bonnet.
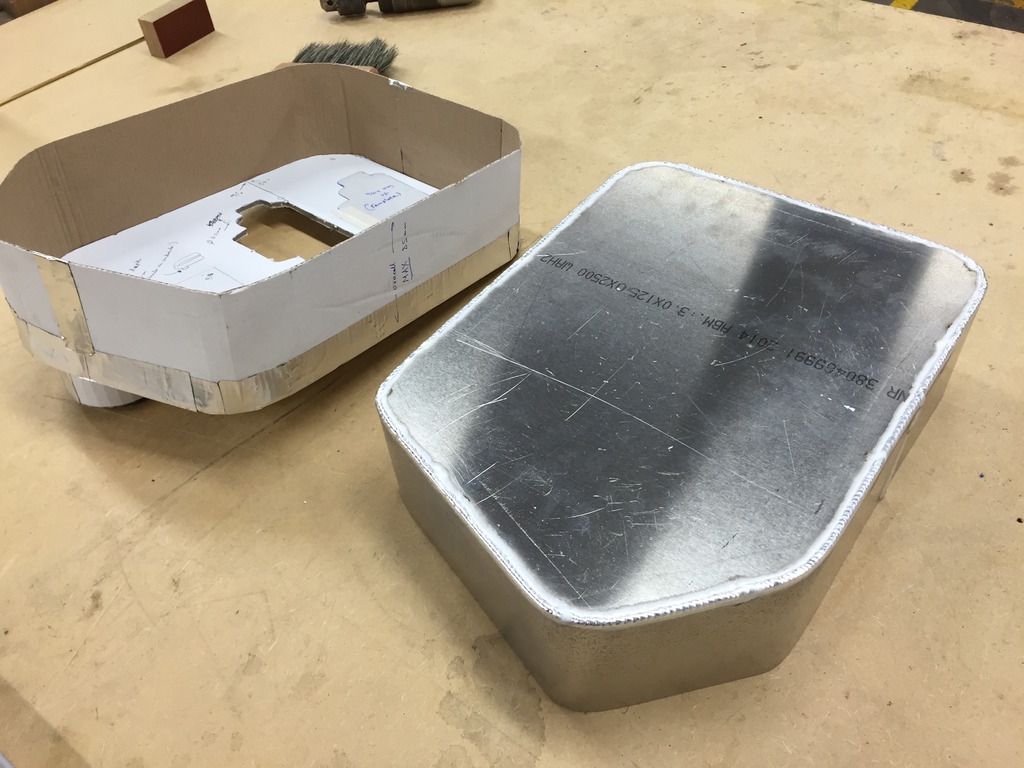
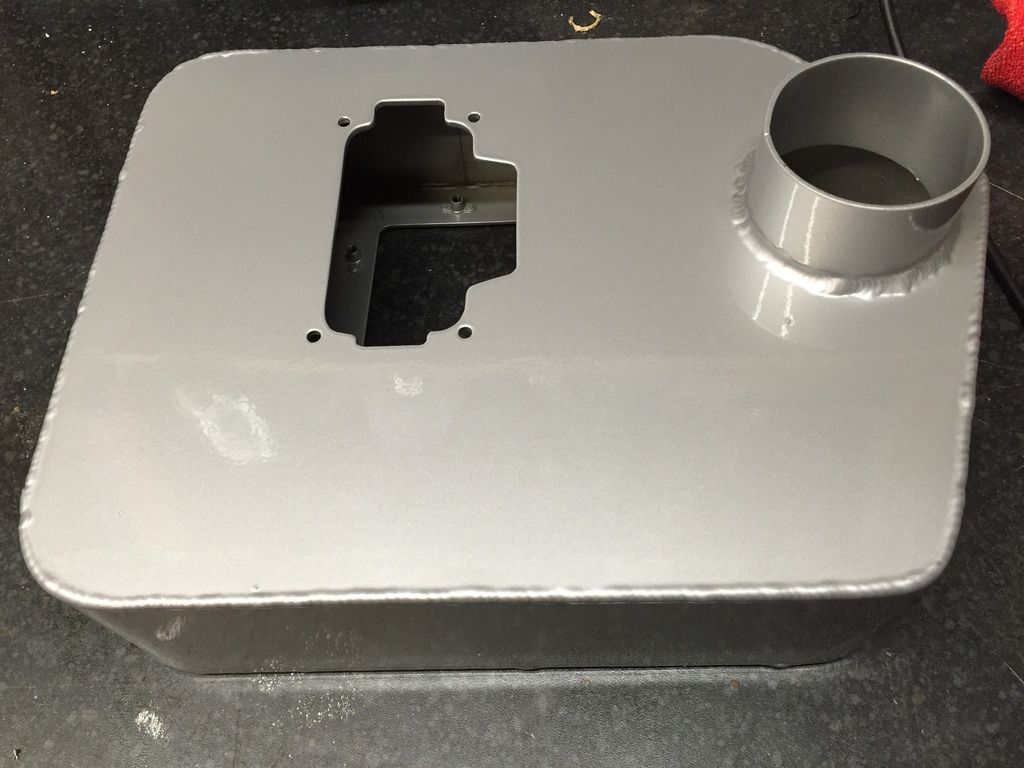
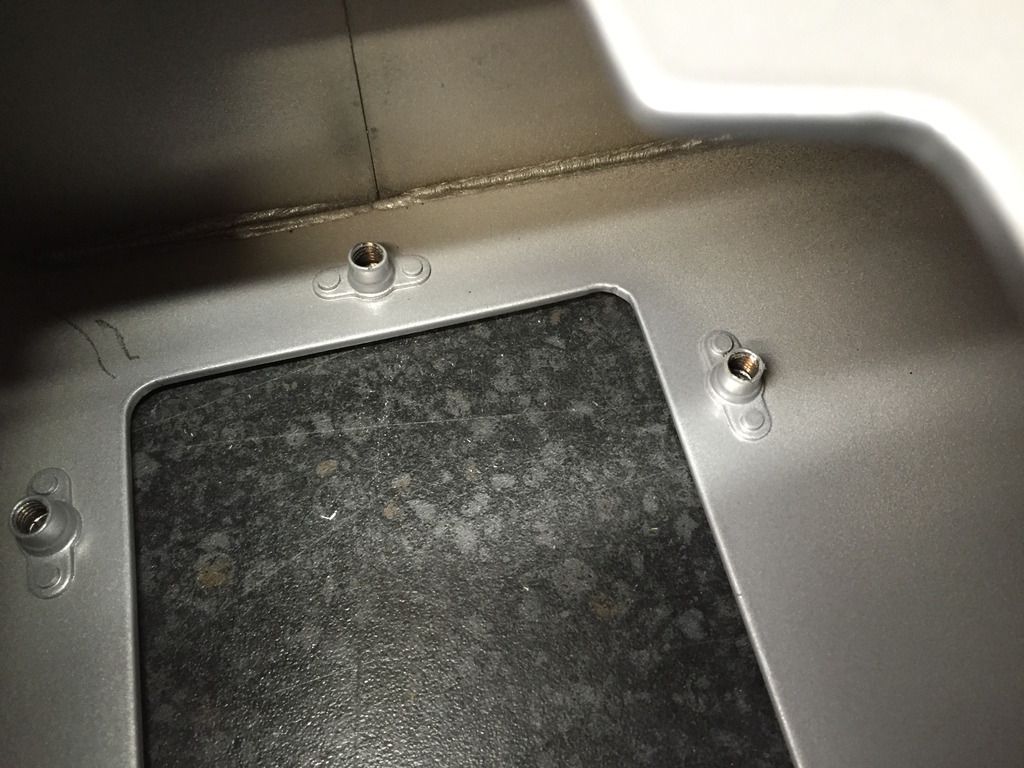
The previous way I have seen the lid to an airbox is to have a complicated system of catches and seals. I didn't like this design so I opted for a closed box with an access hole. This is not only far easier to fabricate but much stronger and there are no clips to come undone. Plus I was able to get aerospace grade anchor nuts to secure the lid.
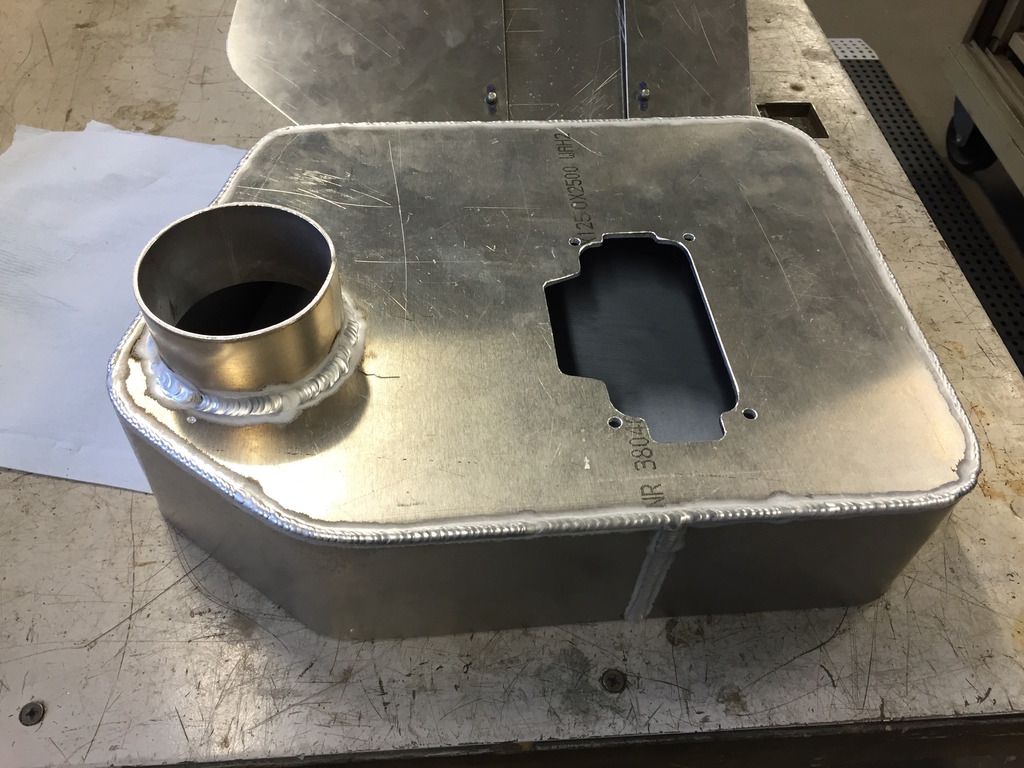
The top and base are made from 3 mm sheet and the sides from 2.5 mm sheet. Consequently, due to this construction, the airbox is extremely rigid.
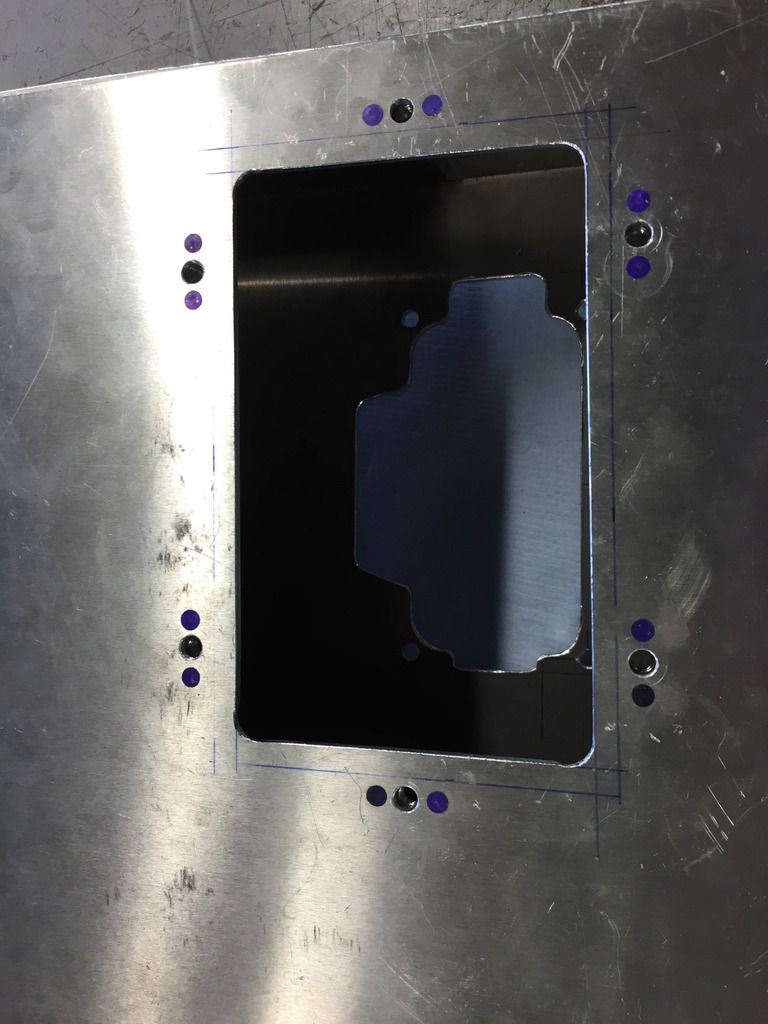
Base and top with access hole before welding together.
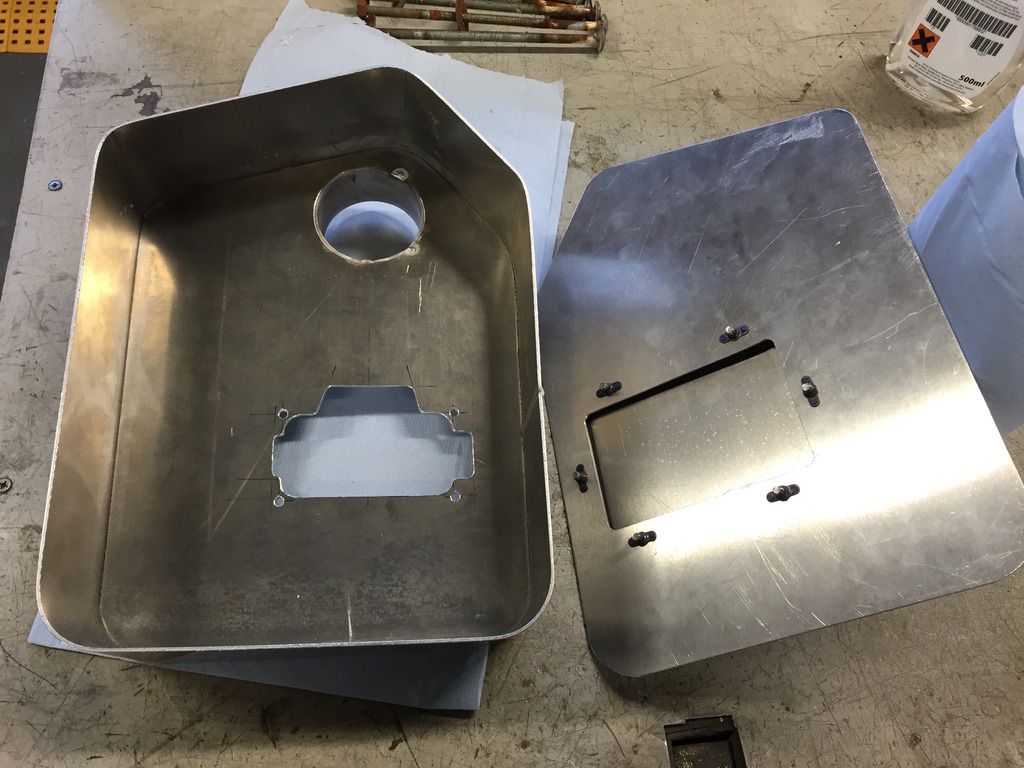
Underside of the access hole showing the anchor nuts.
Top of the access hole showing how the anchor nuts are held in place.
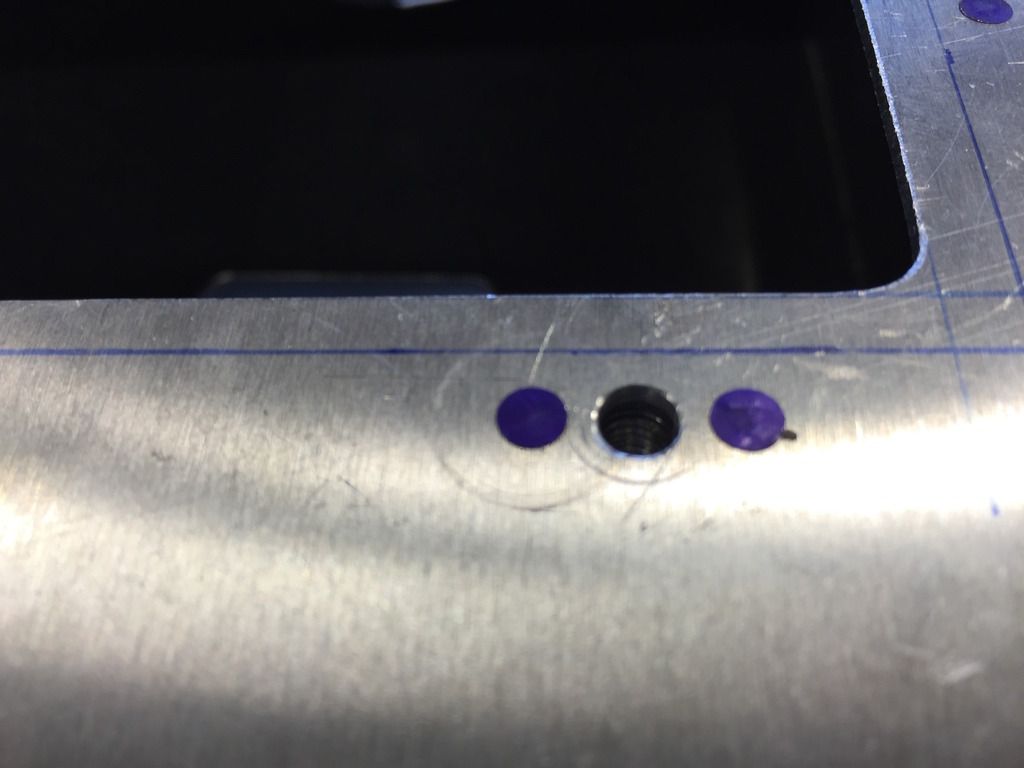
Close-up of the attachments. These are aerospace grade anchor nuts that are virtugally flush and only protrude by a fraction of a mm.
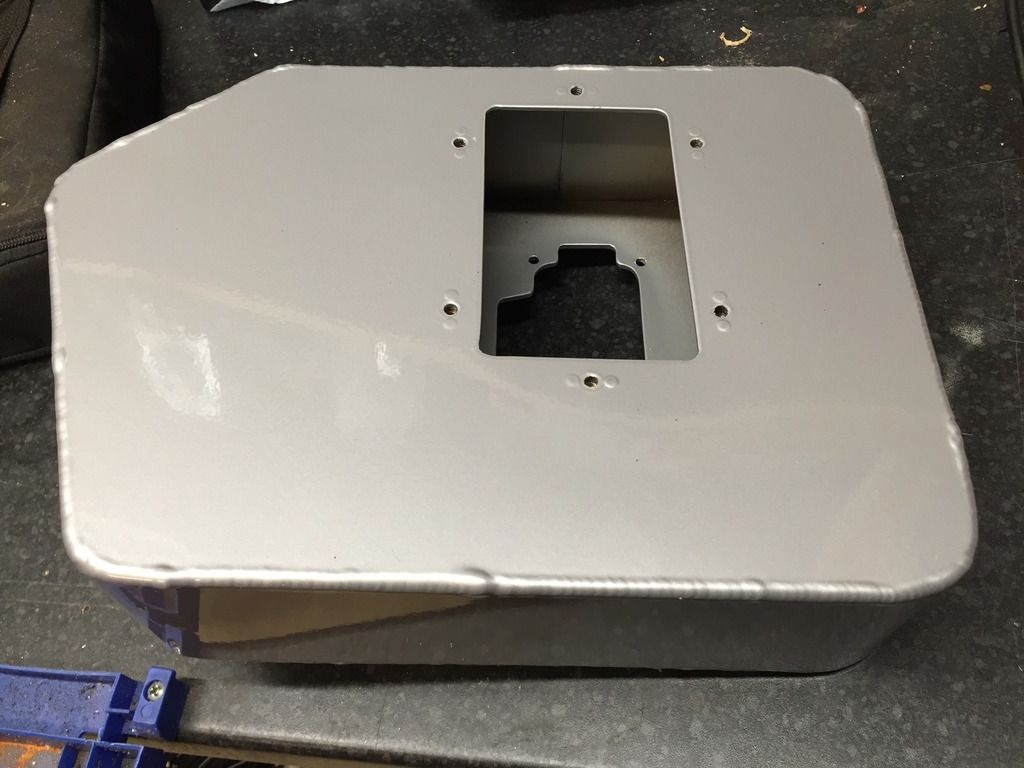
My next dilemma was how to make the airbox look nice. I bought a metal polishing kit but I soon realised that my efforts were pretty woeful despite me polishing a small section for ages, plus it would be very frustrating every time it got a fresh scratch. So I decided to have it powder coated which would be far neater and durable.
Just back from being powder coated in an aluminum colour, it is very similar to the look of an allow wheel.
The anchor nut fixings are just visible.
Underside.
Inside.
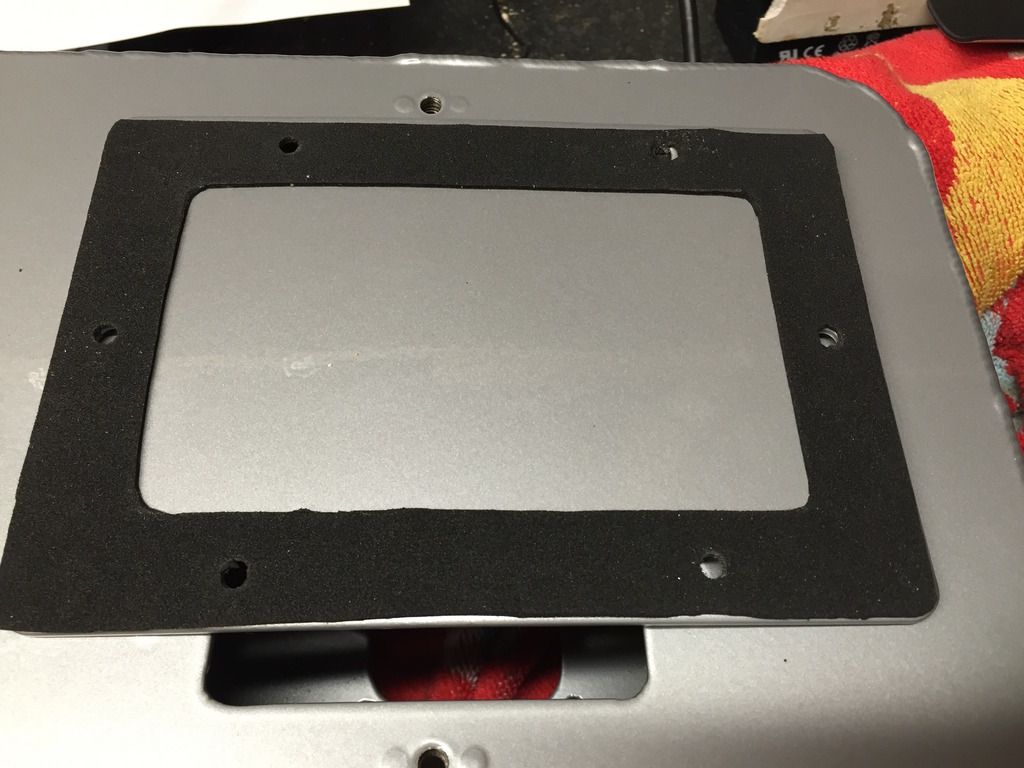
The underside of the lid showing the thin foam seal (not cut as neatly as I was hoping).
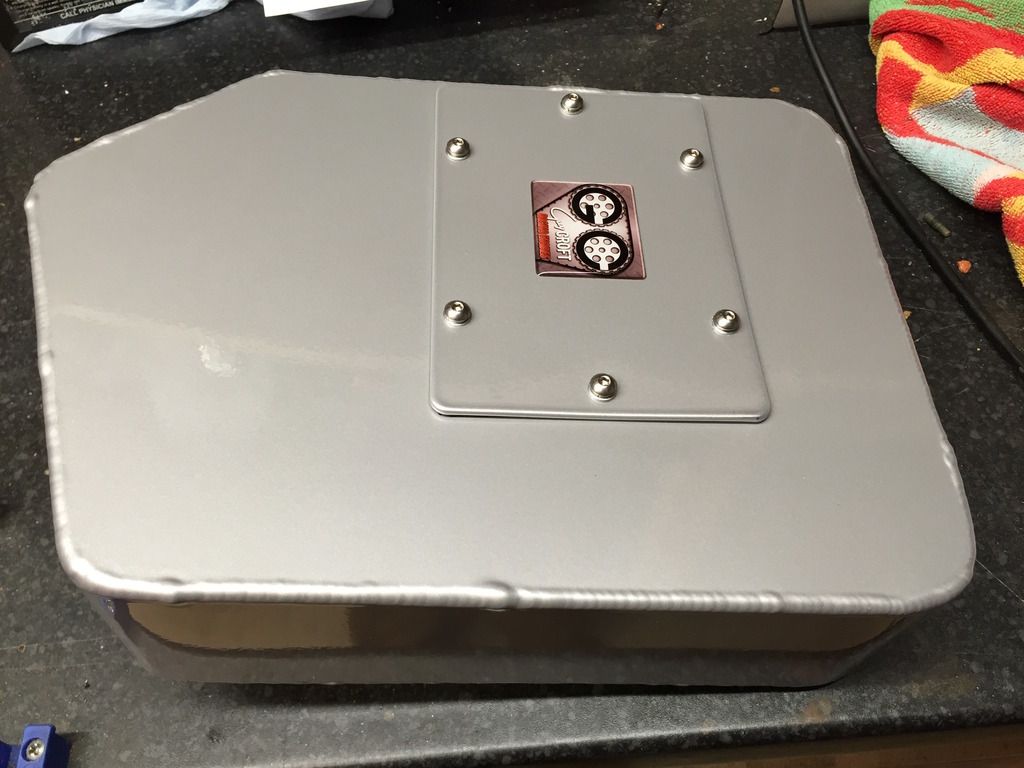
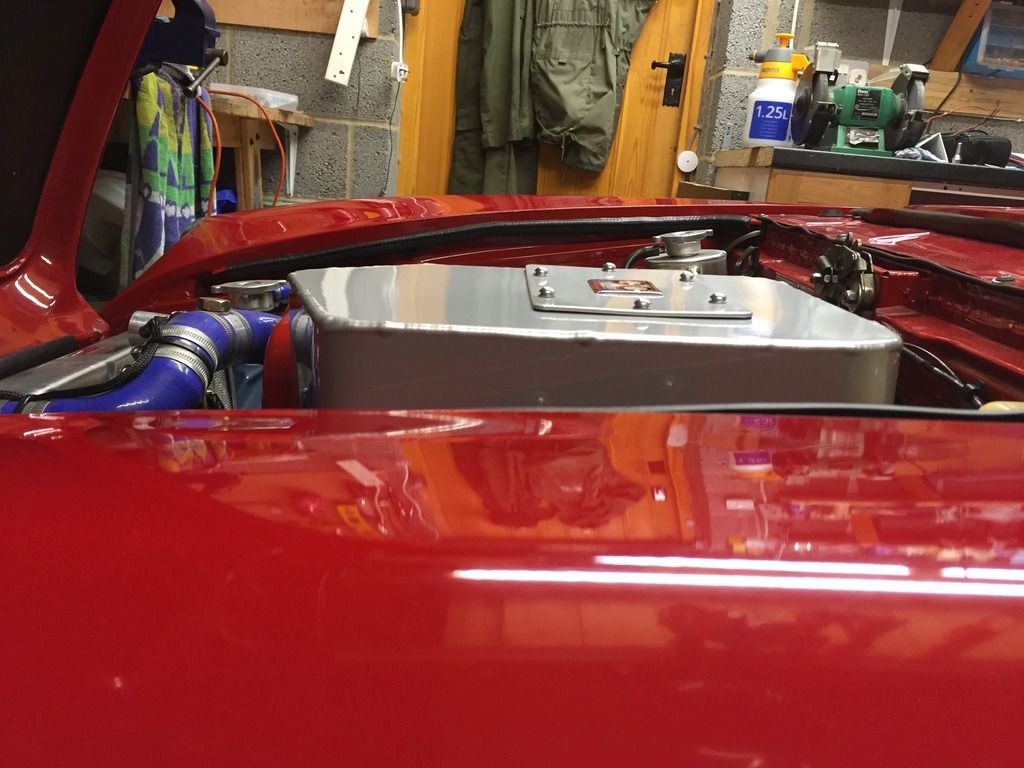
Lid fitted. I placed the GC badge on the lid not only for aesthetic reasons but it also indicates the right way that the lid fits!
To fit the airbox was a slight fiddle so I placed rags in the carb' intake to prevent any of the nuts or washers falling in whilst fitting them.
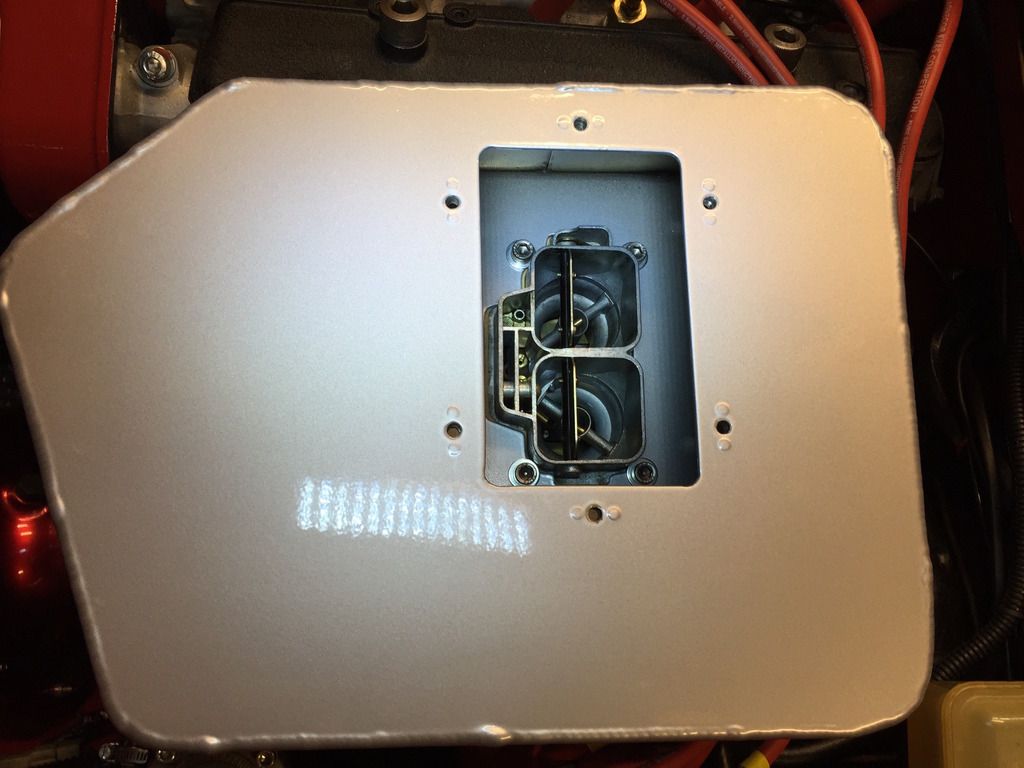
Thankfully the hose to the K&N Apollo intake fitted ok.
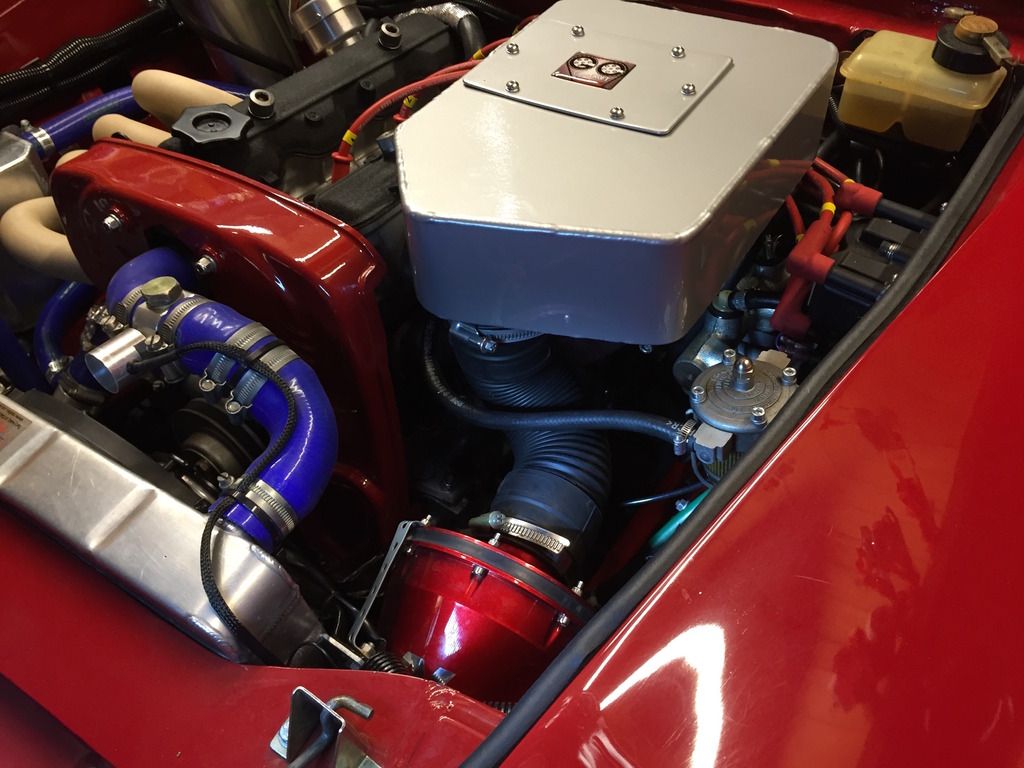
And yes it does clear the bonnet - PHEW!
I gave the engine a quick run in the garage and there was no annoying resonance and it sounded great.
Last October I took my Spider to the renowned tuning experts at Northampton Motorsports to do a rolling road test. This was to iron out a small flat-spot which I thought could be resolved by re-jetting the carb plus I wanted to do a power run. However, they discovered that not only was the timing on the distributor jumping erratically, but that the small plenum over the carb was sapping 10 bhp!
The problem with the distributor was due to the pin holding the drive gear having slipped out and was hitting the cam casing. This must have been cause of the erratic timing as the tapping would cause the bob-weights to jump.
The bent pin having drifted out.
A witness mark on the casing is visible.
Finally fixed with a roll-pin.
Ditching the plenum chamber
The other problem was the small plenum chamber, although neat and well made, it was sapping 10 bhp!
So I went to see the engineers at my work and I fabricated a cardboard dummy airbox to help them make one from aluminum. I made a pillar of Plasticine and placed it on the top of the cardboard lid (not shown) to check that it cleared to bonnet.
The previous way I have seen the lid to an airbox is to have a complicated system of catches and seals. I didn't like this design so I opted for a closed box with an access hole. This is not only far easier to fabricate but much stronger and there are no clips to come undone. Plus I was able to get aerospace grade anchor nuts to secure the lid.
The top and base are made from 3 mm sheet and the sides from 2.5 mm sheet. Consequently, due to this construction, the airbox is extremely rigid.
Base and top with access hole before welding together.
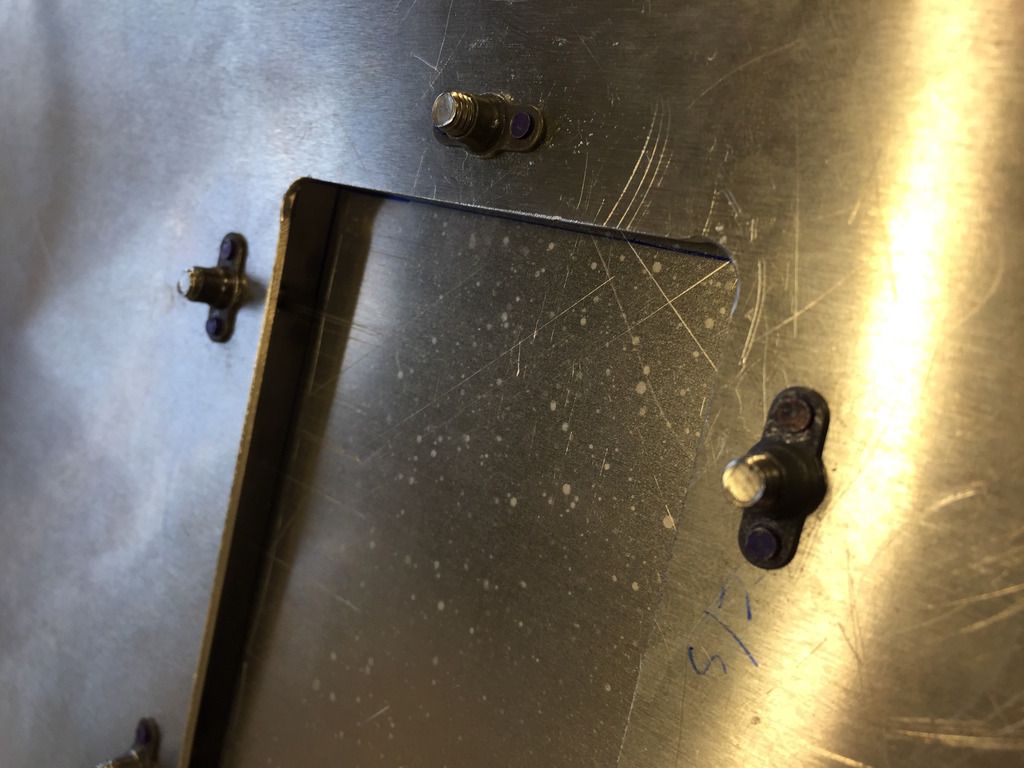
Underside of the access hole showing the anchor nuts.
Top of the access hole showing how the anchor nuts are held in place.
Close-up of the attachments. These are aerospace grade anchor nuts that are virtugally flush and only protrude by a fraction of a mm.
My next dilemma was how to make the airbox look nice. I bought a metal polishing kit but I soon realised that my efforts were pretty woeful despite me polishing a small section for ages, plus it would be very frustrating every time it got a fresh scratch. So I decided to have it powder coated which would be far neater and durable.
Just back from being powder coated in an aluminum colour, it is very similar to the look of an allow wheel.
The anchor nut fixings are just visible.
Underside.
Inside.
The underside of the lid showing the thin foam seal (not cut as neatly as I was hoping).
Lid fitted. I placed the GC badge on the lid not only for aesthetic reasons but it also indicates the right way that the lid fits!
To fit the airbox was a slight fiddle so I placed rags in the carb' intake to prevent any of the nuts or washers falling in whilst fitting them.
Thankfully the hose to the K&N Apollo intake fitted ok.
And yes it does clear the bonnet - PHEW!
I gave the engine a quick run in the garage and there was no annoying resonance and it sounded great.
GC-05
'If you think experts are expensive, you should try amateurs!'
A redline run my GC's engine: https://www.youtube.com/watch?v=80nEhsJbH2w
'If you think experts are expensive, you should try amateurs!'
A redline run my GC's engine: https://www.youtube.com/watch?v=80nEhsJbH2w
Who is online
Users browsing this forum: No registered users and 166 guests